15 Stunning Staircase Wall Decor Ideas to Transform Your Home
Let’s be honest – your staircase wall probably looks like a forgotten wasteland right now. You walk past it every single day, and it just sits there, blank and boring, making zero contribution to your home’s personality. Well, I’m here to tell you that your stairs deserve better, and so do you!
I’ve spent the last decade obsessing over interior design (yeah, I’m that person who rearranges furniture at 2 AM), and staircase walls have become my favorite canvas. They’re literally the perfect spot to showcase your style without overwhelming any single room. Plus, who doesn’t love turning a mundane transitional space into something that makes guests go “wow”?
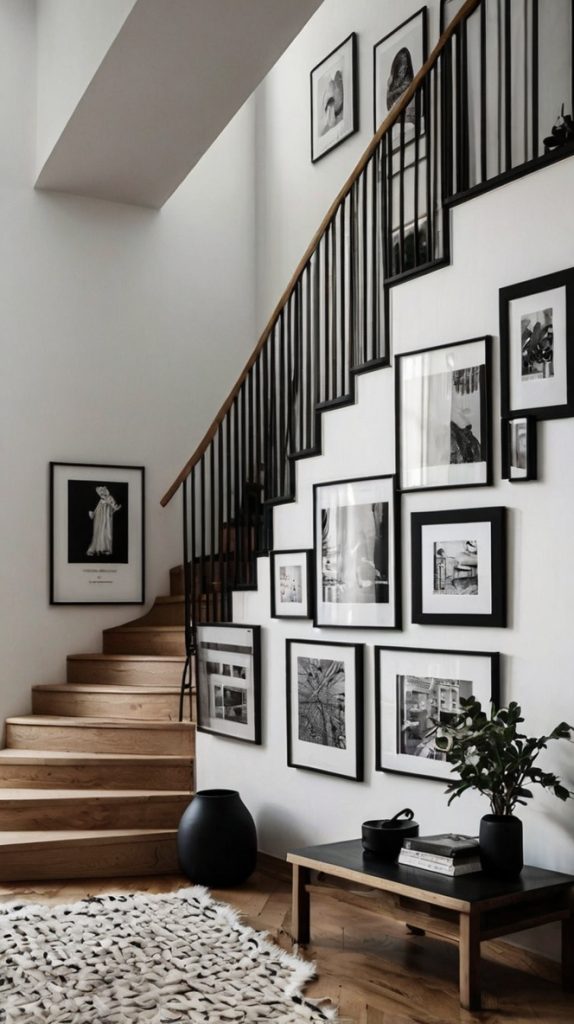
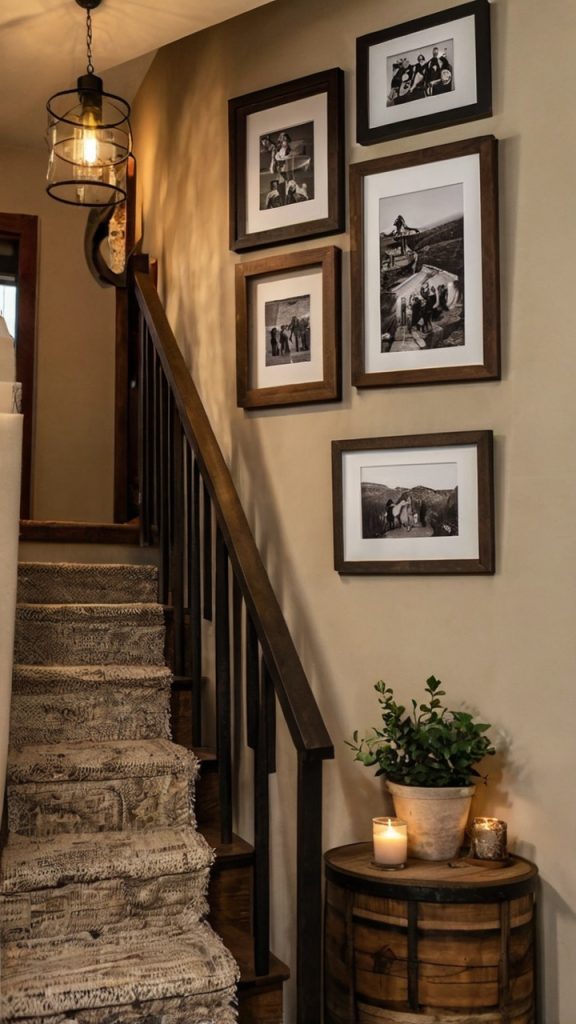
Gallery Wall of Family Photos
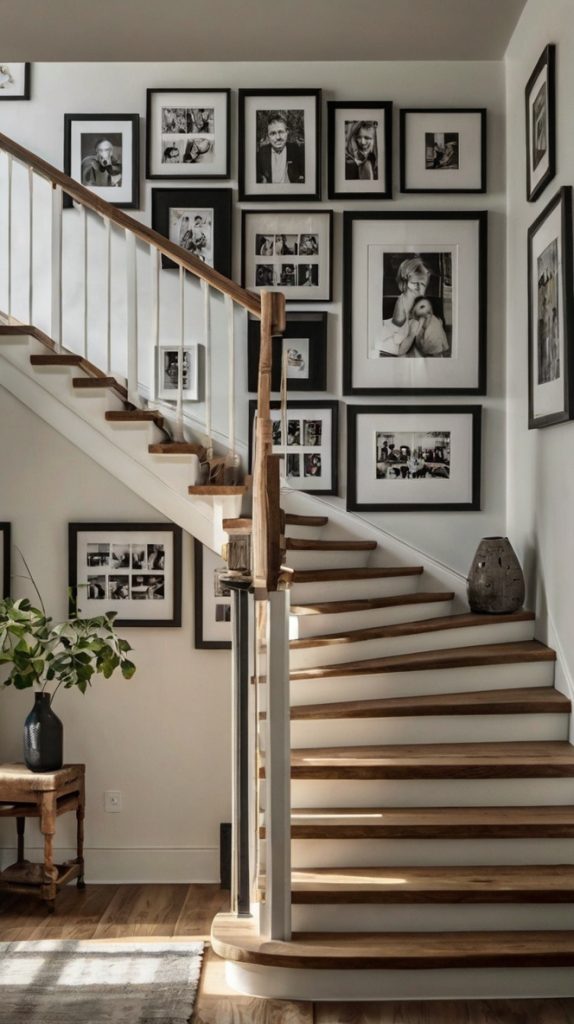
Nothing beats the classic family photo gallery, and honestly, if you haven’t tried this on your staircase wall yet, what are you even doing? This approach transforms your daily climb into a nostalgic journey through your favorite memories. I started mine five years ago with just ten photos, and now I’ve got forty-three frames marching up those stairs like they own the place.
Planning Your Photo Gallery Layout
The secret to a stunning gallery wall lies in the planning. I learned this the hard way after putting seventeen nail holes in my wall before getting it right. Start by cutting paper templates of your frames and taping them to the wall first. Trust me, your drywall will thank you.
You want to maintain consistent spacing between frames – typically 2-3 inches works perfectly. I like to follow the staircase angle with my arrangement, creating a diagonal flow that naturally guides the eye upward. Mix frame sizes for visual interest, but stick to a cohesive color palette for the frames themselves.
Choosing the Right Photos
Here’s where it gets fun. Don’t just throw up every photo you own 🙂
Consider these selection criteria:
- Mix black and white with color photos for depth
- Include different life stages and family members
- Balance formal portraits with candid shots
- Add unexpected elements like concert tickets or kids’ artwork
Frame Selection Tips
Your frames make or break this look. I personally love mixing metallics with wood tones, but you do you. Just remember that consistency in frame style (even with varied sizes) creates cohesion. Thrift stores are goldmines for unique frames – sand them down and spray paint them to match your aesthetic.
Floating Shelves with Plants
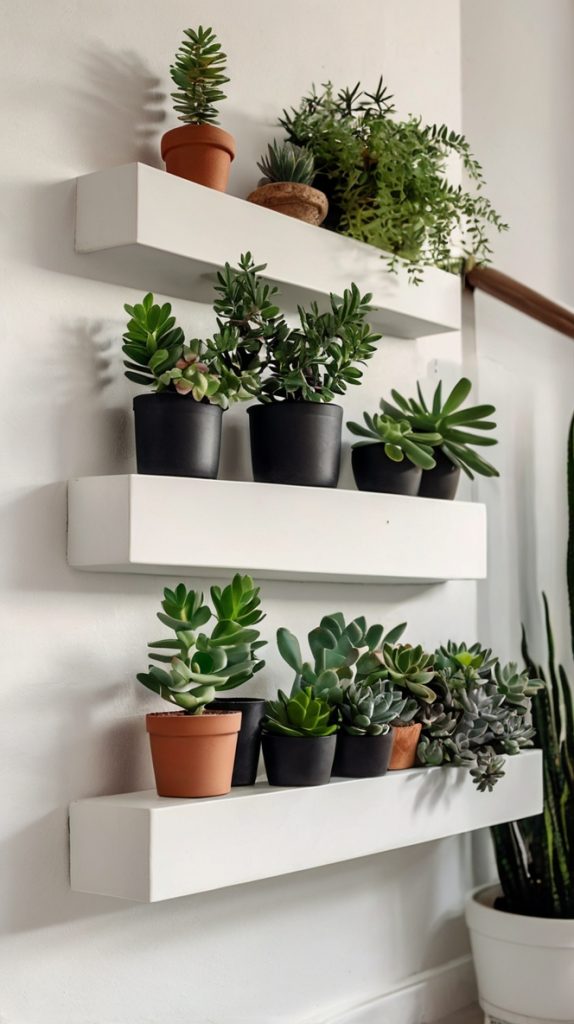
Ever noticed how plants instantly make any space feel more alive? Floating shelves on your staircase wall create the perfect opportunity to build a vertical garden that doesn’t eat up floor space. My staircase jungle started with three shelves and has now evolved into what my friends call “the Amazon rainforest experience.”
Shelf Placement Strategy
Stagger your shelves at different heights to create visual movement. I space mine about 18-24 inches apart vertically, offsetting them horizontally for a dynamic look. The key is ensuring they don’t interfere with your natural path up the stairs – nobody wants a face full of pothos at 6 AM.
Install shelves at comfortable viewing heights. The lowest shelf should sit at least 60 inches from the stair tread below it. This prevents any head-bumping incidents (learned that one the hard way).
Best Plants for Staircase Shelves
Not all plants thrive in stairway conditions. Here are my tried-and-true winners:
- Pothos: Practically indestructible and trails beautifully
- Snake plants: Vertical growth perfect for narrow spaces
- Philodendrons: Low maintenance with gorgeous foliage
- Air plants: No soil needed, minimal mess
- Succulents: If your stairs get good light
Styling Your Plant Shelves
Mix plant heights and textures for maximum impact. I combine trailing plants with upright growers and throw in some decorative objects too. Small sculptures, candles, or books between plants prevent that “garden center” look. Vary your pot styles but keep a consistent color theme – I stick to terracotta and white ceramics.
Geometric Wall Art Display
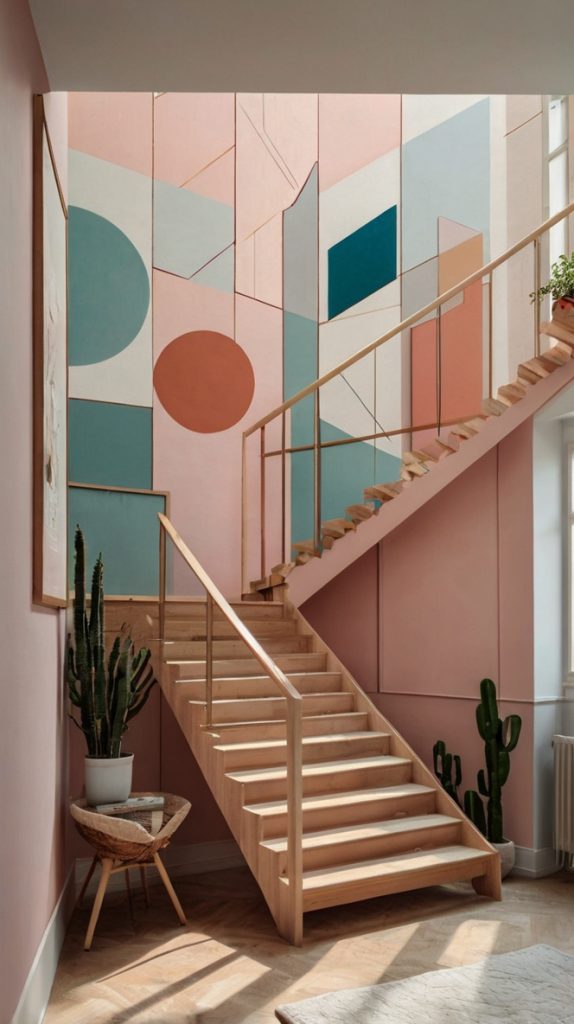
Geometric art brings that modern edge everyone’s craving these days. The clean lines and bold shapes work particularly well on staircase walls because they complement the angular nature of the stairs themselves. When I installed my first geometric piece, it literally transformed my entire hallway vibe.
Creating Visual Balance
The trick with geometric art is avoiding chaos. Start with one large statement piece as your anchor, then build around it with smaller complementary pieces. I arrange mine in odd numbers – groups of three or five create more dynamic compositions than even numbers.
Consider the existing angles in your staircase. Your art should either echo these lines or deliberately contrast them. My diagonal staircase pairs beautifully with hexagonal prints that soften those harsh angles.
Color Coordination Strategies
Keep your color palette tight. I limit myself to three main colors plus neutrals. This prevents the “art store explosion” look that happens when you get too enthusiastic. Bold, contrasting colors work best in well-lit stairways, while softer tones suit dimmer spaces.
Also Read: 15 Stunning Aesthetic Wall Decor Ideas to Transform Your Room
Vintage Mirror Arrangement
Mirrors on staircase walls? Absolutely genius. They bounce light around, make the space feel larger, and add that touch of elegance everyone secretly wants. My collection started with one flea market find and has grown into what I call my “hall of reflection” (yes, I’m that corny).
Mirror Placement Magic
Never place mirrors directly opposite windows on staircase walls – the glare will blind you during certain times of day. Instead, angle them to reflect interesting architectural features or artwork. I position mine to catch and redistribute light from the upstairs hallway.
Group mirrors of varying sizes and shapes for maximum impact. Mixing round, rectangular, and ornate frames creates visual texture that flat art can’t achieve. Space them 4-6 inches apart for breathing room.
Sourcing Vintage Mirrors
FYI, the best vintage mirrors hide in unexpected places:
- Estate sales early on Saturday mornings
- Facebook Marketplace (patience required)
- Architectural salvage yards
- Your grandmother’s attic (seriously, ask her)
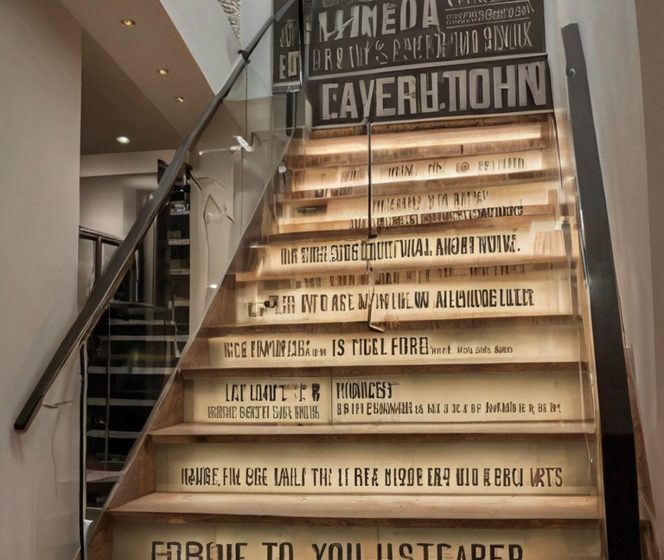
Inspirational Quote Wall

Before you roll your eyes, hear me out. Quote walls have evolved way beyond those “Live, Laugh, Love” disasters we all cringe at. Modern quote displays can actually be sophisticated and deeply personal. Mine features hand-lettered pieces mixed with typography prints that genuinely inspire me daily.
Selecting Meaningful Quotes
Choose quotes that actually resonate with you, not what Pinterest tells you to like. I include everything from song lyrics to my kid’s funny sayings. The authenticity makes all the difference. Limit yourself to 5-7 quotes maximum – any more becomes overwhelming.
Display Methods That Work
Mix up your presentation styles:
- Framed prints for formal quotes
- Vinyl lettering directly on the wall for modern vibes
- Hand-painted quotes for that personal touch
- Letter boards for quotes you want to change regularly
I arrange mine at different heights following the staircase angle, creating a flowing narrative as you climb. Start with your longest quote at the bottom and work up to shorter ones.
Minimalist Line Art Prints
Minimalist line art has this magical ability to look both simple and sophisticated. These pieces work especially well in smaller stairways where busy patterns might overwhelm. My collection focuses on single-line drawings that create maximum impact with minimal visual weight.
Curating Your Collection
Stick to a consistent line weight across all pieces for cohesion. I keep mine to black lines on white backgrounds, though navy or deep green can work beautifully too. The simplicity means you can display more pieces without creating visual chaos.
Choose subjects that tell a story together. My stairway features a progression from abstract faces at the bottom to architectural sketches at the top. This creates movement and interest as you climb.
Framing for Maximum Impact
With minimalist art, the frame becomes part of the artwork. Ultra-thin black frames maintain the minimal aesthetic, while thick white mattes create breathing room around each piece. I use identical frames throughout for that gallery-worthy look.
Also Read: 15 Stunning Wall Decor Ideas to Transform Your Home Instantly
Nature-Themed Wall Murals
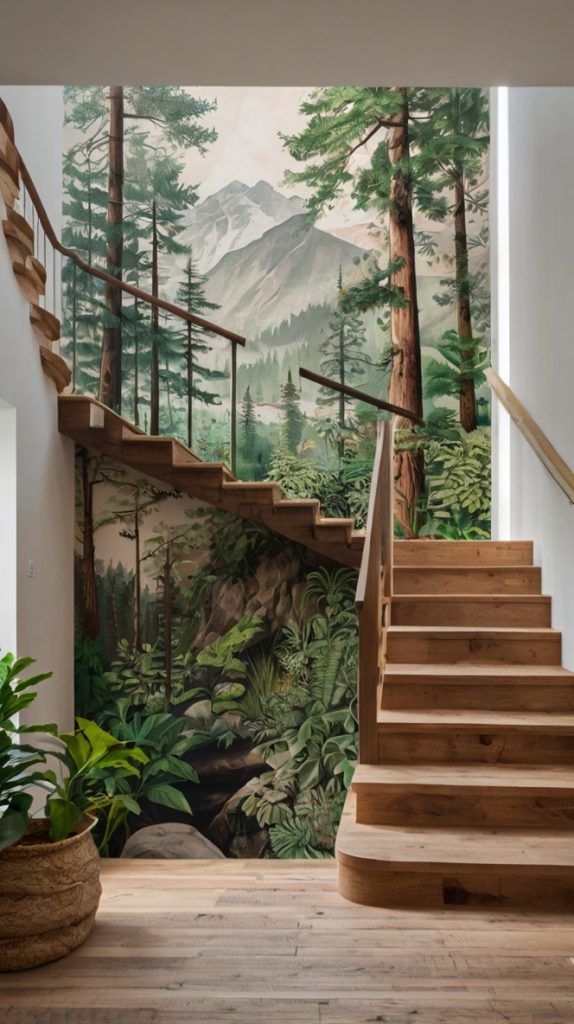
Want to make a serious statement? Wall murals transform your staircase into an immersive experience. After living with beige walls for three years, I finally painted a forest mural that makes me feel like I’m climbing through the woods every morning.
Choosing Your Nature Scene
Consider your staircase lighting when selecting a scene. Dark, moody forests work in well-lit spaces, while bright, airy landscapes suit dimmer stairways. The mural should complement, not compete with, your home’s overall style.
Popular nature themes that work:
- Mountain ranges for dramatic effect
- Botanical prints for subtle elegance
- Ocean scenes for calming vibes
- Abstract landscapes for modern homes
DIY vs Professional Installation
IMO, unless you’re genuinely artistic, hire a pro or use high-quality wallpaper murals. My DIY attempt looked like a kindergarten art project gone wrong. Removable wallpaper murals offer a happy medium – professional-looking results without the commitment or cost.
String Light Photo Display
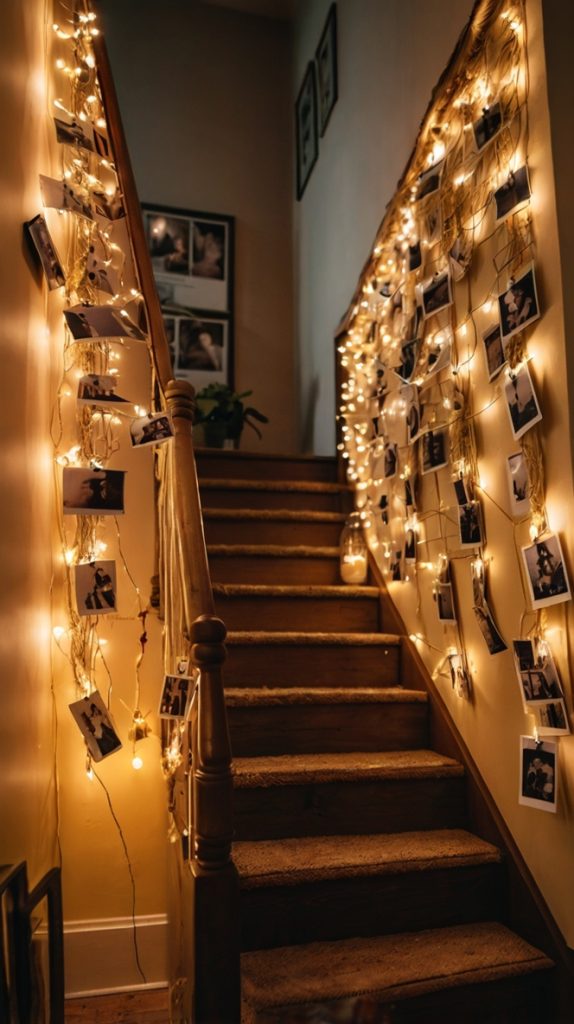
This combo brings together the warmth of string lights with personal photos for a display that’s both functional and decorative. I installed mine three years ago, and guests still comment on how cozy it makes the stairway feel.
Installation Techniques
Run lights in a zigzag pattern up the wall for even coverage. I use removable adhesive hooks every 12-18 inches to prevent sagging. Battery-operated LED strings eliminate cord management headaches, though plugin versions offer more consistent brightness.
Attach photos with mini clothespins or clips designed for string lights. Space them every 6-8 inches for balanced distribution. Mix photo orientations – both landscape and portrait – for visual variety.
Creating Ambiance
Layer your lighting for maximum effect. The string lights provide accent lighting, but you’ll need additional sources for functional illumination. Dimmer switches on overhead lights let you adjust the mood. During parties, I dim the overheads and let the string lights create magic.
Colorful Abstract Canvas Set
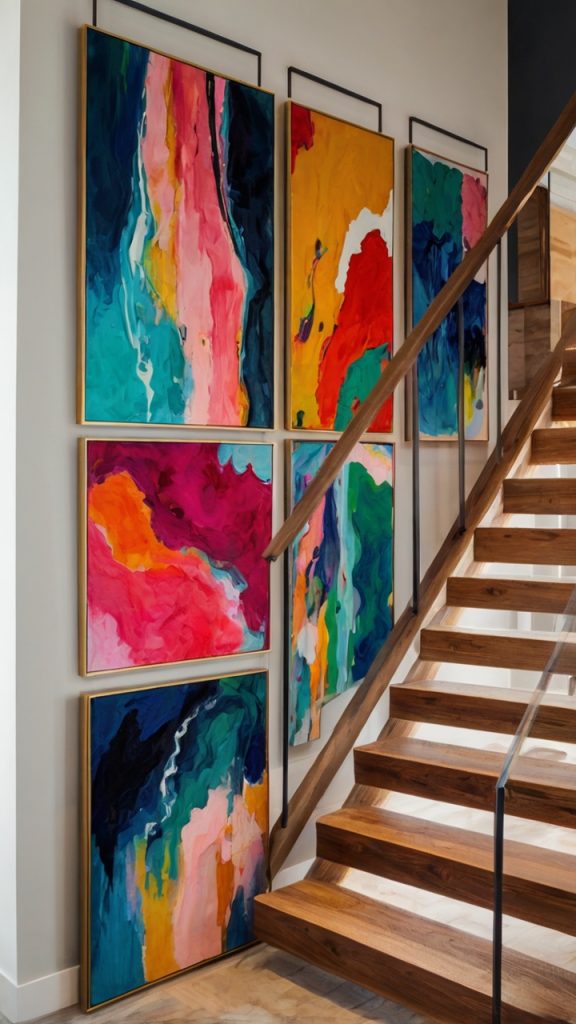
Abstract art lets you introduce bold colors without committing to specific subjects or themes. My staircase features a triptych that ties together colors from both floors of my house. The result? A cohesive flow that makes the whole space feel intentional.
Color Theory for Stairwells
Pull colors from adjacent rooms to create continuity. If your living room features navy and gold, incorporate these into your abstract pieces. This creates visual flow without being too matchy-matchy. I use the 60-30-10 rule: 60% dominant color, 30% secondary, 10% accent.
Consider how natural light changes throughout the day. Colors look different in morning versus evening light, so observe your stairwell at various times before committing.
Arrangement Patterns
Abstract sets work best when arranged with purpose:
- Linear arrangements following the stair angle
- Grid patterns for modern aesthetics
- Asymmetrical groupings for artistic flair
- Overlapping placement for gallery vibes
Also Read: 15 Amazing Large Wall Decor Living Room Ideas You’ll Love
Hanging Macramé Decorations
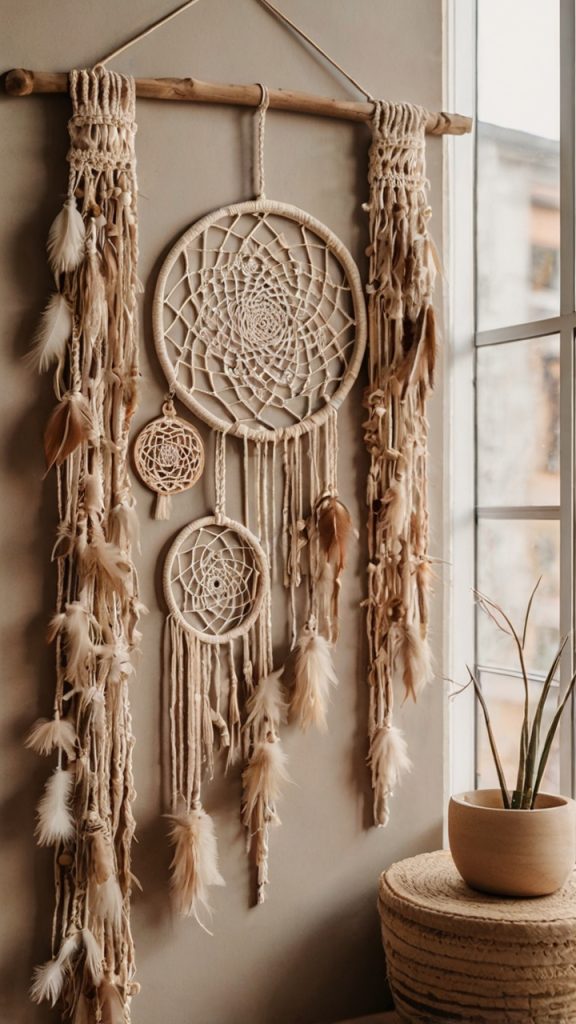
Macramé brings texture and bohemian charm to stark staircase walls. The 3D element adds depth that flat art can’t achieve. My collection started with one piece and has grown into what my partner calls “the rope situation” :/
Selecting Macramé Styles
Match the scale to your space. Oversized pieces work in stairwells with high ceilings, while smaller, delicate designs suit standard-height spaces. I mix wall hangings with plant holders for variety.
Consider these factors:
- Knot complexity affects visual weight
- Natural versus dyed fibers change the vibe
- Incorporating beads or rings adds interest
- Fringe length impacts overall proportion
Installation and Spacing
Mount macramé pieces at varying heights to create movement. I stagger mine between 12-24 inches apart vertically, allowing each piece room to breathe. Use sturdy wall anchors – these pieces are heavier than they look.
Modern Metal Wall Sculptures
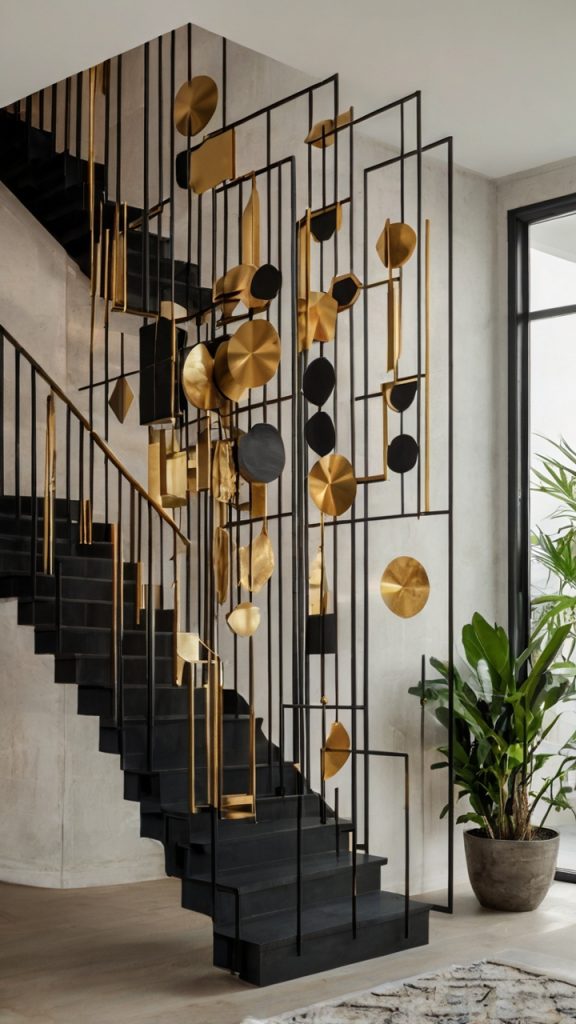
Metal sculptures add an industrial edge that paintings can’t match. The way they cast shadows throughout the day creates an ever-changing display. My favorite piece actually looks completely different at sunset versus noon.
Choosing Metal Finishes
Mix metals thoughtfully for sophisticated results. I combine brushed steel with copper accents, but going monochromatic works too. Consider how metal finishes interact with your lighting – polished surfaces reflect more than matte finishes.
Weather-resistant finishes matter even indoors. Humidity from nearby bathrooms can cause certain metals to tarnish. Powder-coated or sealed pieces maintain their appearance longer.
Creating Dimensional Displays
Layer sculptures at different depths from the wall for maximum impact. Some pieces should sit flush while others project outward. This creates shadows and visual interest that changes with viewing angle.
Vertical Planter Wall
Vertical planters maximize your growing space without sacrificing floor area. My living wall system transformed a boring stretch of staircase into what feels like a botanical garden. Plus, the air quality improvement is no joke.
Choosing Planter Systems
Modular systems offer the most flexibility. I started with six pockets and have expanded to eighteen. Self-watering systems reduce maintenance, especially for hard-to-reach upper sections.
Consider these options:
- Pocket planters for small plants
- Wall-mounted boxes for larger specimens
- Trellis systems for climbing plants
- Hydroponic walls for low-maintenance growing
Plant Selection for Vertical Growing
Not all plants enjoy vertical life. Choose varieties that:
- Tolerate occasional dry periods
- Don’t require deep root systems
- Trail or stay compact
- Handle your stairway’s light conditions
Ombre Painted Staircase Wall
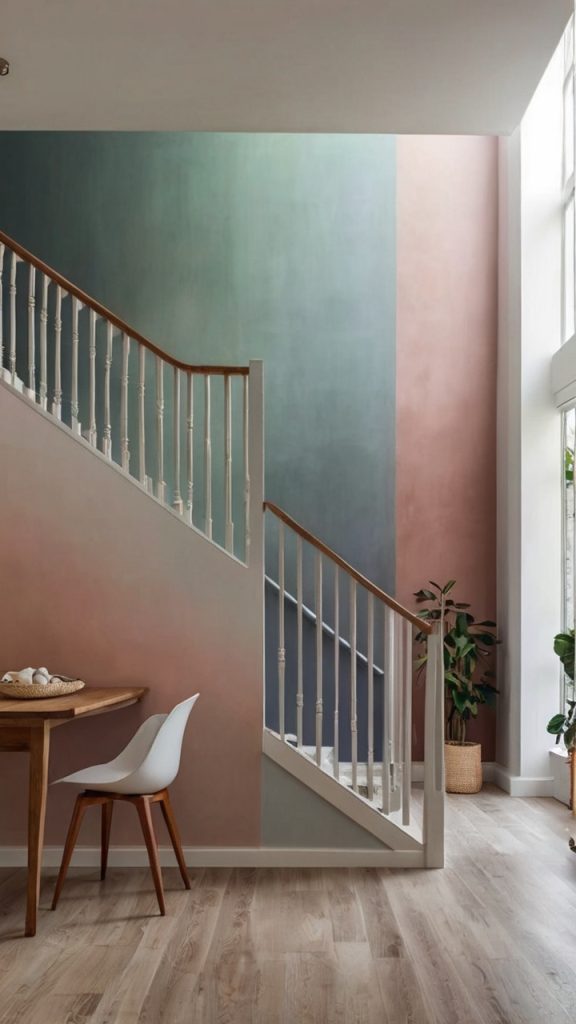
Ombre walls create incredible visual impact with just paint. The gradient effect draws the eye upward, making stairs feel less steep. My ombre wall took a weekend to complete and completely transformed the space.
Mastering the Gradient Technique
Start with the lightest shade at the top. This creates an uplifting effect as you climb. I use five shades of the same color, blending each transition while the paint’s still wet. Work in horizontal sections, following the stair angle.
Use a large brush or sponge for blending. The key is working quickly before paint dries. Having a helper makes this infinitely easier – one person paints while the other blends.
Color Selection Strategy
Choose colors that complement your existing decor. Cool tones like blues and greens create calming effects, while warm oranges and pinks energize the space. Test your gradient on poster board first to ensure you love the transition.
DIY Wooden Frame Collage
Creating your own frames adds personal touch that store-bought can’t match. My DIY collection includes frames made from reclaimed fence boards, driftwood, and even old window frames. Each piece tells a story beyond just the photo it holds.
Sourcing and Preparing Wood
Reclaimed wood adds instant character. Check construction sites (with permission), beach areas for driftwood, or architectural salvage yards. Sand pieces smooth enough to handle safely but rough enough to maintain texture.
Treat raw wood with sealant to prevent splinters and deterioration. I use matte polyurethane for a natural look. Consider the wood’s color – will you stain, paint, or leave it natural?
Assembly Techniques
Basic frames require only:
- Four cut pieces at 45-degree angles
- Wood glue and corner clamps
- Small finishing nails for reinforcement
- Picture hanging hardware
Get creative with shapes – hexagons, circles, and asymmetrical designs add interest. Mix your DIY frames with store-bought ones for an eclectic gallery feel.
Mixed Media Art Installation
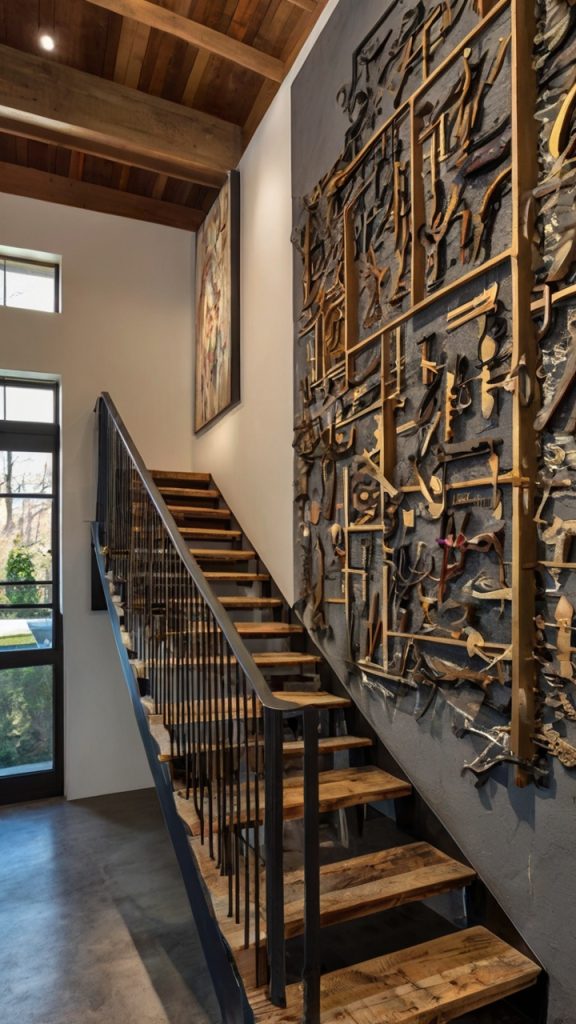
Mixed media installations combine different materials and techniques for truly unique displays. My staircase features a combination of photographs, fabric art, found objects, and painted elements that evolved organically over two years.
Planning Your Installation
Start with a loose theme to maintain cohesion. Mine revolves around travel memories – maps, tickets, photos, and souvenirs from various trips. The unifying element is the color palette rather than strict subject matter.
Create zones within your installation:
- A focal point that anchors the entire display
- Supporting elements that complement the main piece
- Transitional pieces that connect different sections
- Breathing space to prevent overwhelming viewers
Combining Different Elements
Layer elements at varying depths for dimension. I mount some pieces directly on the wall, others on shadow boxes, and some suspended on invisible wire. This 3D approach creates shadows and interest that flat displays can’t achieve.
Pulling It All Together
After exploring all these options, you might feel overwhelmed. Here’s the thing – you don’t need to choose just one approach. My own staircase combines elements from several of these ideas, and that’s perfectly fine. The best staircase wall reflects your personality, not some designer’s rulebook.
Start small with one section and build from there. Maybe begin with a simple gallery wall and add floating shelves later. Or paint that ombre wall you’ve been dreaming about and gradually add art pieces. Rome wasn’t built in a day, and neither is the perfect staircase display.
Remember, your staircase wall sees more daily traffic than most rooms in your house. Make it count. Whether you go minimal or maximal, modern or vintage, the important thing is creating something that makes you smile every time you climb those stairs. Because honestly, if you’re not excited about your own staircase, you’re missing out on a huge opportunity to inject joy into your daily routine.
Now stop scrolling Pinterest and start creating. Your blank staircase wall has been patient long enough, and those Amazon boxes aren’t going to transform themselves into floating shelves. Trust me, once you start this project, you’ll wonder why you waited so long. Happy decorating!