15 Brilliant Wall Decor Living Room Ideas on a Budget
Look, we’ve all been there – staring at that blank living room wall like it’s personally offended us. You know what I’m talking about, right? That vast expanse of nothingness that screams “I have zero personality!” every time guests walk in. Well, grab your coffee (or wine, I don’t judge), because I’m about to share some budget-friendly wall decor ideas that transformed my living room from boring to brilliant without maxing out my credit card.
After moving into my third apartment in five years, I’ve become somewhat of an expert at decorating on a shoestring budget. Trust me, you don’t need to drop thousands to create a space that looks like it belongs in a magazine. The trick lies in knowing where to splurge, where to save, and how to get creative with what you’ve got.
Floating Wooden Shelves
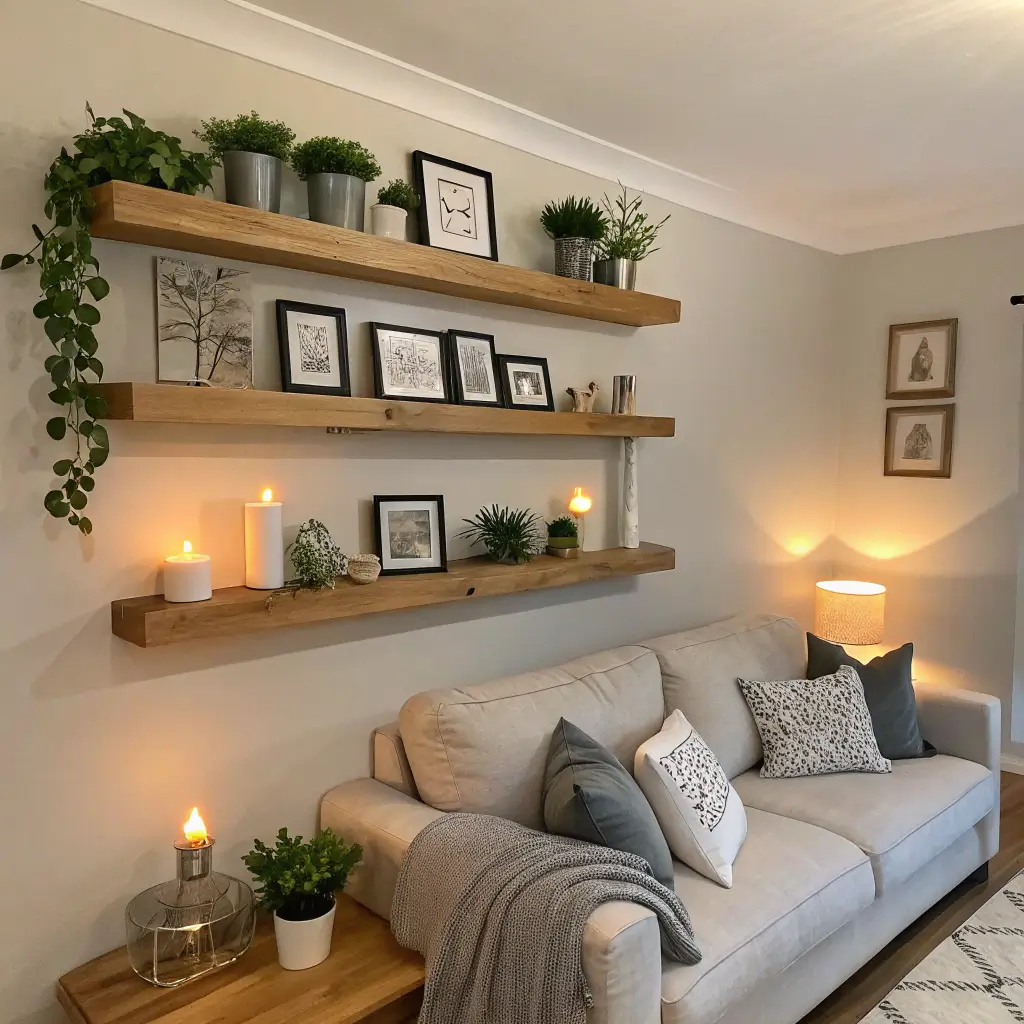
Let me start with my absolute favorite wall transformation hack – floating wooden shelves. These babies are the Swiss Army knife of wall decor. Not only do they add visual interest, but they also give you functional storage space. Win-win, am I right?
I installed my first set of floating shelves using basic brackets from the hardware store and some reclaimed wood I scored for free from a local construction site. Total cost? About $30 for three shelves. The key here is picking the right wood finish that complements your existing furniture. You want cohesion, not chaos.
Making Floating Shelves Work for You
Here’s what makes floating shelves such a game-changer:
- Versatile styling options – switch up your decor seasonally without commitment
- Space-saving design – perfect for small living rooms
- Budget-friendly materials – pine boards work just as well as expensive hardwood
- DIY-friendly installation – seriously, if I can do it, anyone can
When styling your shelves, follow the rule of odds. Group items in sets of three or five for visual appeal. Mix books, plants, and decorative objects, but leave some breathing room. Nobody likes a cluttered shelf – it just looks like you’re using your wall as storage overflow.
Large Statement Mirror

Want to know the secret to making your living room look twice its size? A large statement mirror changes everything. I’m talking about those oversized beauties that command attention the moment someone walks in. And before you say “but mirrors are expensive,” hear me out.
I found my 4-foot vintage-style mirror at a thrift store for $40. Sure, the frame needed some TLC, but nothing a can of spray paint couldn’t fix. The transformation took about an hour of actual work, and now everyone thinks I dropped serious cash on it.
Strategic Mirror Placement Tips
The placement of your mirror matters more than you think:
- Opposite a window maximizes natural light
- Above the sofa creates a focal point
- Near the entryway opens up the space instantly
Pro tip: Check Facebook Marketplace and estate sales for mirrors. People practically give them away when moving, and you can score some incredible deals.
Minimalist Gallery Wall
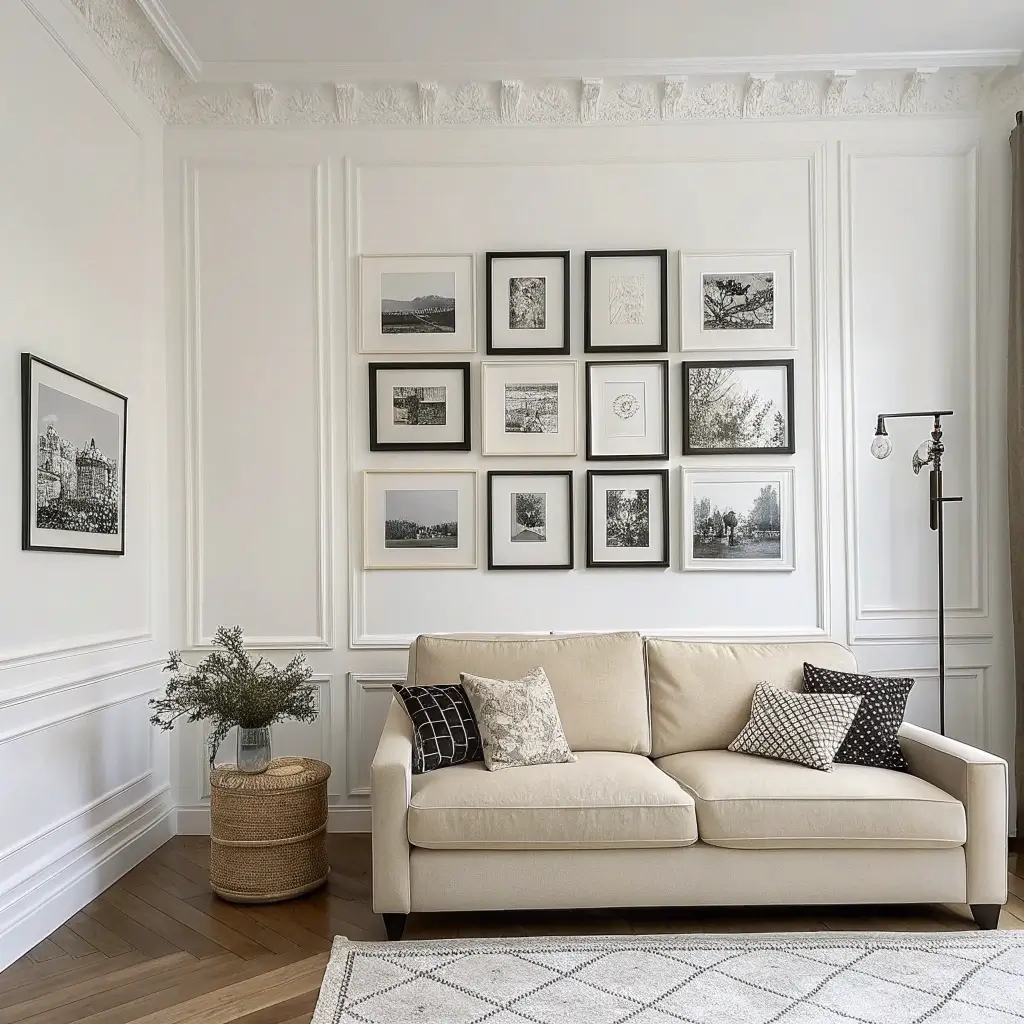
Okay, let’s talk about gallery walls. I know what you’re thinking – “aren’t those overdone?” Well, yes and no. The cluttered, every-inch-covered gallery walls are definitely out. But a minimalist gallery wall? That’s timeless, baby.
Creating a cohesive gallery wall doesn’t mean buying matching frames from some expensive home store. I mix thrift store finds with IKEA frames, and nobody’s the wiser. The secret lies in maintaining consistent spacing and choosing a unifying element – whether that’s frame color, mat width, or image style.
Building Your Gallery Wall on a Budget
Here’s my foolproof approach:
- Start with paper templates – cut paper to frame sizes and tape to wall
- Choose a consistent color palette – black and white photos with wooden frames never fail
- Mix sizes strategically – combine large anchor pieces with smaller supporting frames
- Include personal photos – they’re free and meaningful
FYI, you don’t need professional prints. I print my photos at Costco for pennies, and they look fantastic behind glass.
Oversized Abstract Art
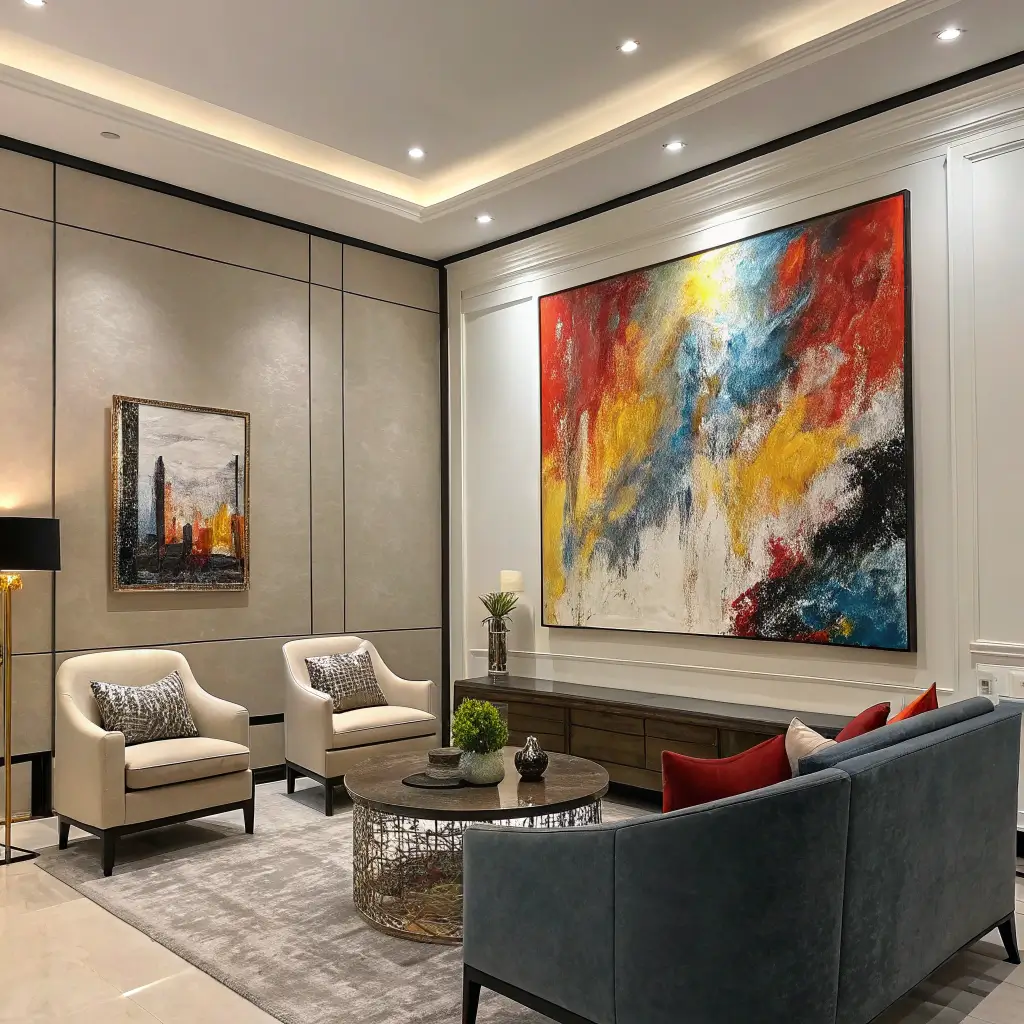
Ever notice how one massive piece of abstract art can make a room look expensive? It’s like instant sophistication. But here’s the kicker – you can totally make your own for under $50.
I created my living room’s centerpiece using a large canvas from a craft store sale, some acrylic paints, and a YouTube tutorial. Three hours later, I had a “custom” piece that perfectly matched my color scheme. My friends think I commissioned it from a local artist. I just smile and say thanks 🙂
DIY Abstract Art Techniques
Want to try it yourself? These techniques work great:
- Pour painting – mix paint with pouring medium for organic patterns
- Geometric shapes – use painter’s tape for crisp lines
- Texture play – add sand or modeling paste for dimension
- Color blocking – simple but striking
The beauty of abstract art? There’s no wrong way to do it. If someone asks what it represents, just say something profound about emotions and watch them nod knowingly.
Macramé Wall Hanging
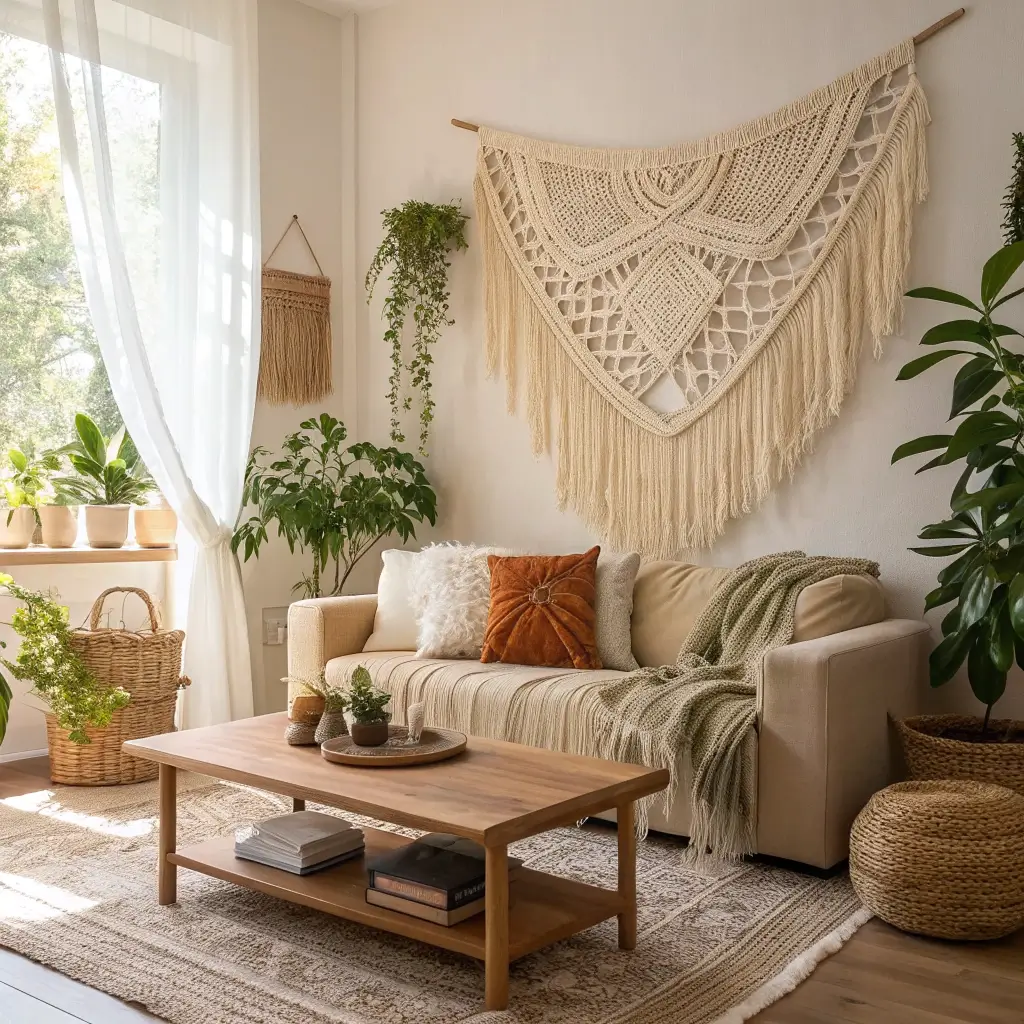
Welcome to the world of macramé wall hangings, where boho meets budget-friendly in the best possible way. These textured beauties add warmth and personality without the commitment of paint or wallpaper.
I learned to make my first macramé piece during lockdown (didn’t we all pick up weird hobbies then?). With $15 worth of cord and a wooden dowel, I created something that would’ve cost $80+ in stores. The learning curve isn’t steep – master three basic knots, and you’re golden.
Getting Started with Macramé
Before you panic about crafting skills, consider this:
- Basic supplies cost under $20 – cord, dowel, scissors
- Free tutorials everywhere – YouTube University strikes again
- Mistakes add character – seriously, imperfections make it look artisanal
- Size flexibility – make it as large or small as your wall needs
IMO, macramé works best when you embrace its organic nature. Don’t stress about perfect symmetry – that handmade vibe is what makes it special.
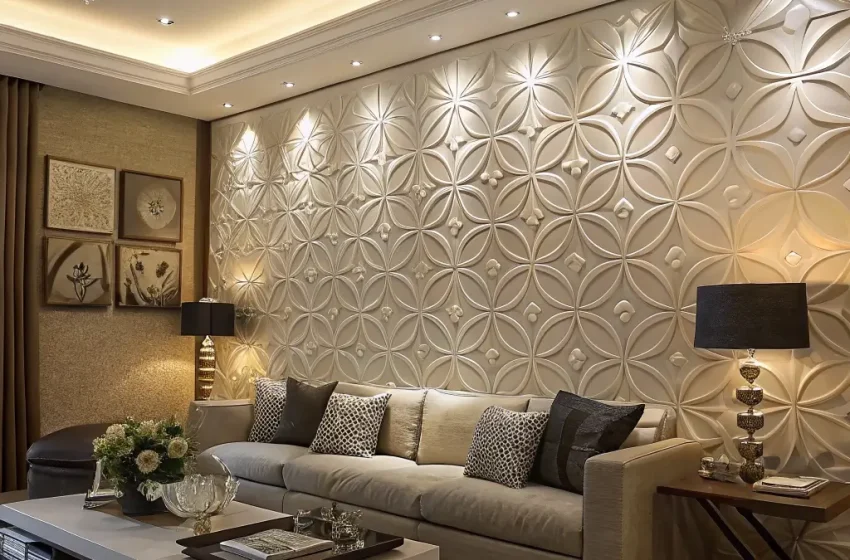
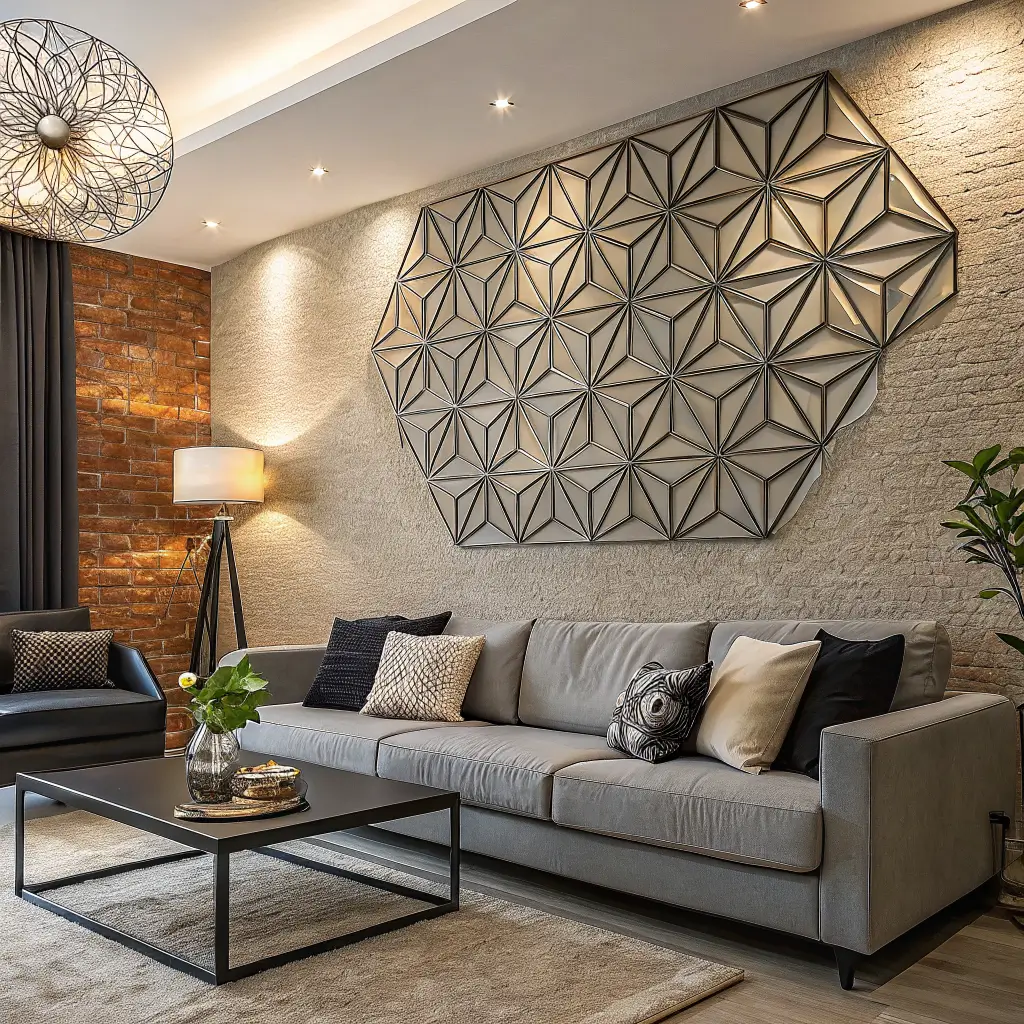
Textured 3D Wall Panels
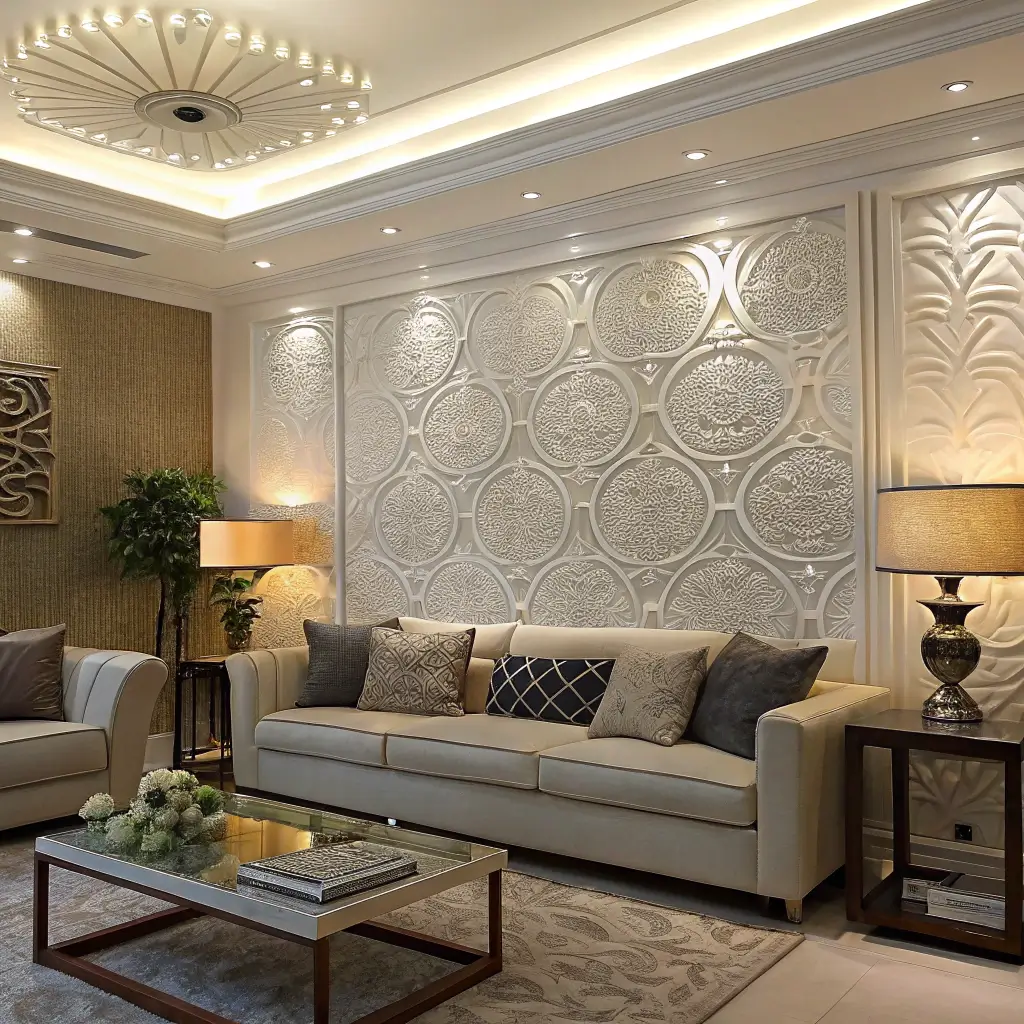
Now, if you really want to blow people’s minds, 3D wall panels create drama without the drama of a full renovation. These panels add architectural interest that photographs beautifully and makes your living room look custom-designed.
I discovered foam 3D panels that look exactly like expensive plaster versions but cost a fraction of the price. We’re talking $30 per pack versus $200+ for the real deal. Installation takes an afternoon, and the impact is immediate.
Installing 3D Panels Like a Pro
Here’s what I learned the hard way:
- Start with a feature wall – one wall makes more impact than scattered panels
- Paint them for cohesion – white creates shadows, dark colors add drama
- Mix patterns carefully – stick to one design for a sophisticated look
- Measure twice, cut once – seriously, learn from my mistakes
The transformation these panels create is insane. My living room went from basic apartment to boutique hotel vibes overnight.
Also Read: 15 Stunning TV Wall Decor Ideas and Cozy Living Room
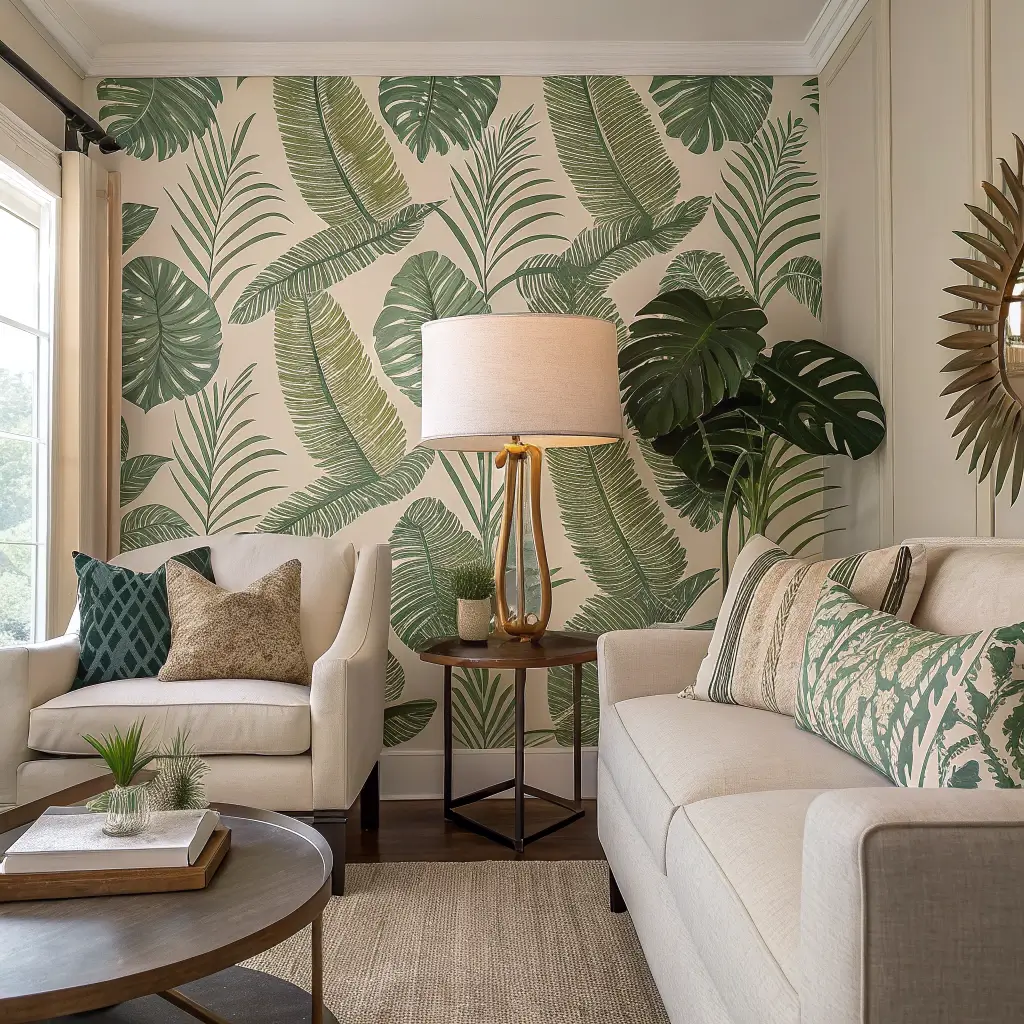
Framed Botanical Prints
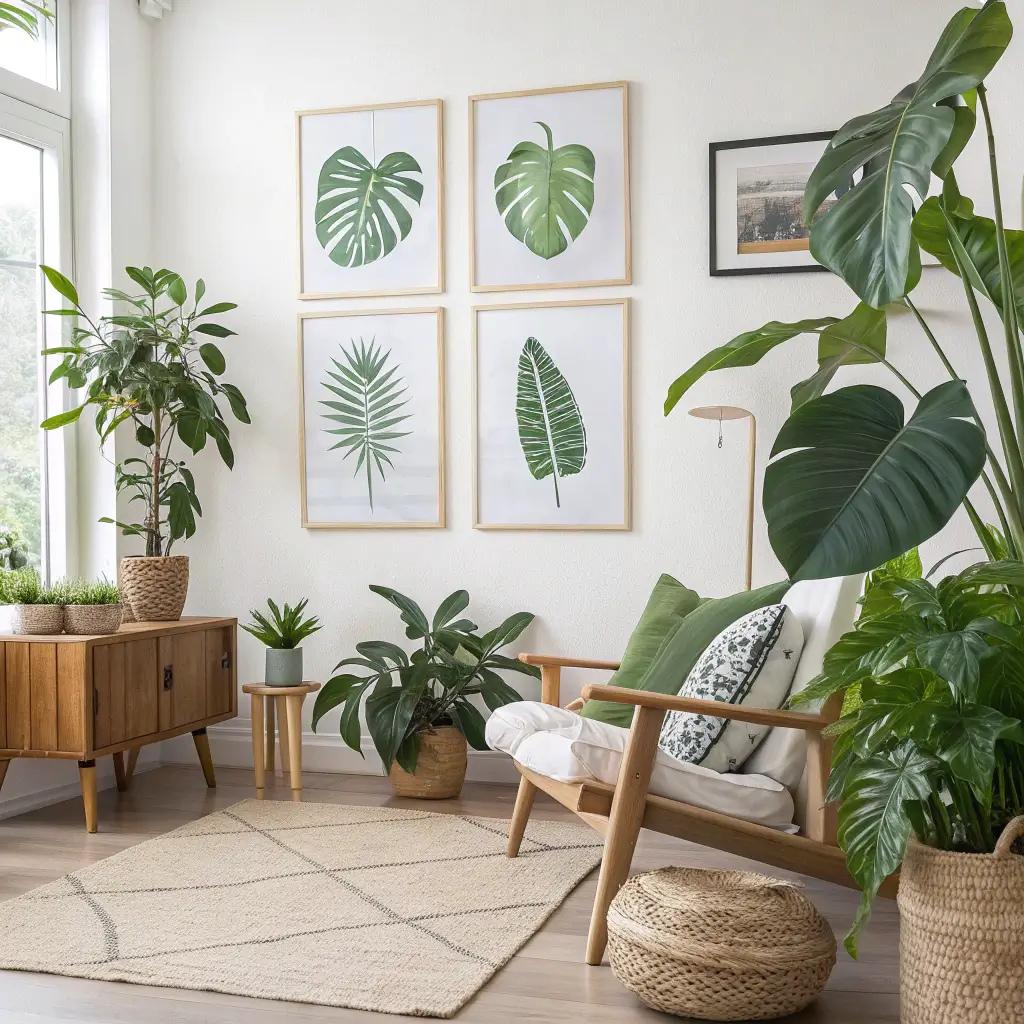
Let’s get one thing straight – botanical prints never go out of style. They bring nature indoors, add color without overwhelming, and work with literally any decor style. Plus, they’re ridiculously affordable when you know where to look.
I built my entire botanical collection for under $40. How? Free vintage botanical downloads from museum websites, printed at home, and framed in thrift store frames I spray-painted gold. The result looks like I raided an antique shop.
Creating a Botanical Display
Want that sophisticated botanical gallery look? Follow these guidelines:
- Stick to a color story – all greens, or mix in some vintage-toned prints
- Vary the subjects – combine flowers, leaves, and scientific diagrams
- Uniform matting – white mats make everything look expensive
- Grid formation – symmetrical arrangements feel intentional
The Metropolitan Museum and Smithsonian offer thousands of high-resolution botanical prints for free. You’re welcome.
Rustic Wooden Signs
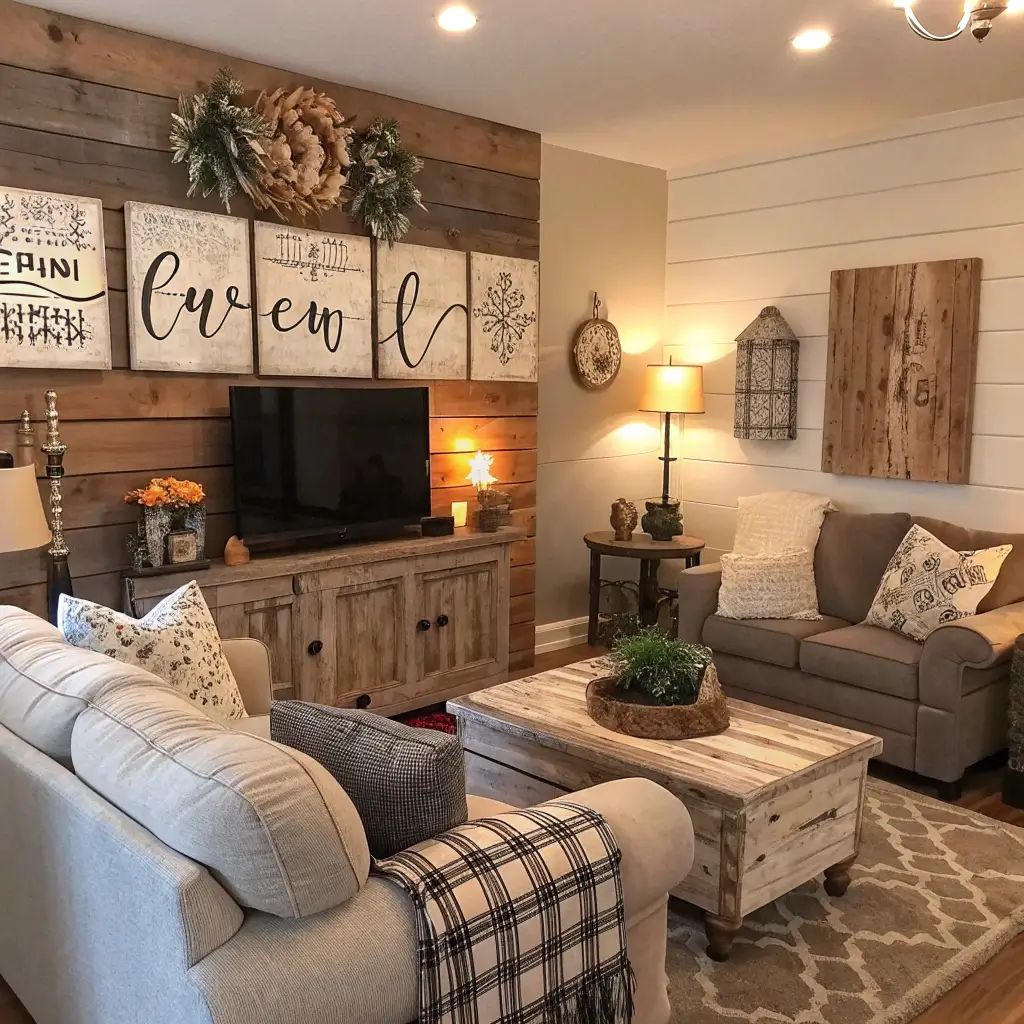
I’ll admit it – rustic wooden signs can go wrong fast. One too many “Live, Laugh, Love” signs and you’ve entered basic territory. But done right? They add personality and warmth that makes a house feel like home.
My approach involves making custom signs with inside jokes or meaningful quotes. I use reclaimed fence boards (free from neighbors renovating) and paint pens for lettering. No Cricut machine needed, though if you have one, go wild.
Making Signs That Don’t Suck
Here’s how to avoid the cliché trap:
- Choose unexpected quotes – song lyrics, movie lines, personal mantras
- Keep fonts simple – elaborate scripts look amateur
- Distress authentically – sandpaper beats fake distressing every time
- Size matters – one large sign beats five small ones
Remember, the goal is adding character, not turning your living room into a farmhouse Pinterest board explosion.
Boho Tapestry Decor
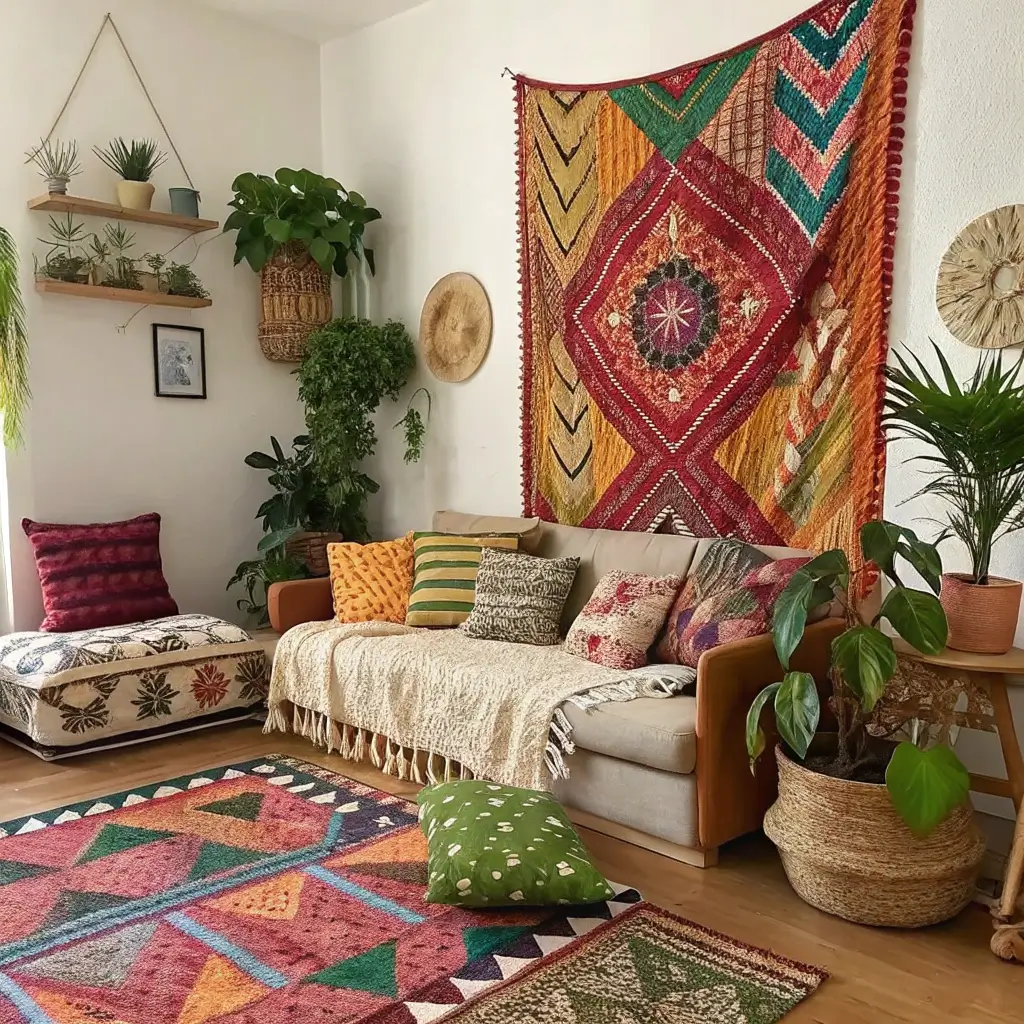
Can we talk about how tapestries are basically the lazy person’s wallpaper? I mean that in the best way possible. They add pattern, color, and texture without any permanent commitment or complicated installation.
I rotate my tapestries seasonally – light and airy for summer, rich jewel tones for fall. At $20-40 each, I can afford to switch things up when I get bored. Try doing that with actual wallpaper :/
Styling Tapestries Beyond Basic
Elevate your tapestry game with these tricks:
- Layer with string lights – instant ambiance
- Frame with curtain rods – looks more intentional than thumbtacks
- Create a canopy effect – drape from ceiling for drama
- Mix with other textures – combine with plants and mirrors
The key is choosing tapestries with artistic merit. Skip the generic mandala prints and look for unique patterns or photography-based designs.
Also Read: 15 Beautiful Wall Decor Bedroom Ideas to Transform Your Space
Geometric Metal Wall Art
Geometric metal wall art hits that sweet spot between modern and timeless. These pieces add structure to organic spaces and bring an industrial edge that keeps things interesting.
I scored a set of three geometric pieces at HomeGoods for $35 total. But here’s a secret – you can make similar pieces using embroidery hoops and spray paint. Arrange them in overlapping patterns, and boom – instant art installation.
Working with Metal Art
Consider these placement strategies:
- Above furniture – creates a cohesive vignette
- Stairway walls – fills awkward vertical spaces
- Corner arrangements – draws the eye upward
- Mixed media displays – combine with mirrors and prints
The beauty of geometric pieces lies in their versatility. They work in minimalist spaces and maximalist ones equally well.
Accent Wall with Wallpaper
I know wallpaper sounds expensive, but hear me out. Peel-and-stick wallpaper has revolutionized the rental-friendly decor game. We’re talking $30-50 to completely transform one wall, and it comes off clean when you move.
My current living room features a subtle geometric print on just the wall behind my TV. It cost me $45 and took two hours to install. The impact? Massive. Everyone asks if I hired a decorator.
Wallpaper Without the Commitment
Master these application tips:
- Start small – one accent wall prevents overwhelm
- Buy extra – pattern matching eats up more than expected
- Smooth religiously – bubbles are your enemy
- Overlap carefully – visible seams kill the illusion
Choose patterns that complement, not compete with, your existing decor. When in doubt, go subtle – you can always add bold accessories.
Decorative Wall Sconces
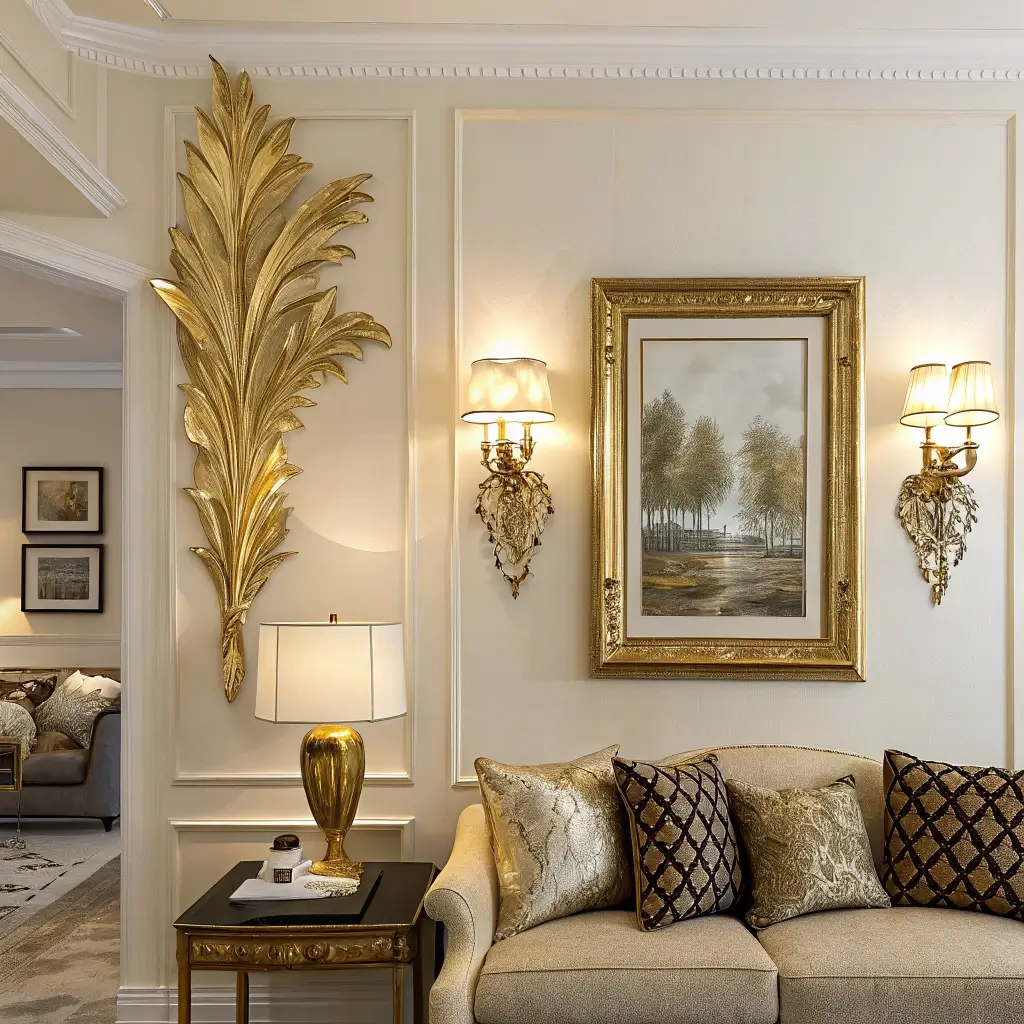
Wall sconces might seem fancy, but battery-operated versions have made them accessible to everyone. No electrician needed, no rewiring required, just instant ambiance and sophistication.
I flanked my sofa with two battery-operated sconces from Amazon ($40 for the pair). They look hardwired, provide perfect reading light, and create that layered lighting designers always talk about.
Sconce Placement Strategy
Maximize impact with smart placement:
- Flank artwork – creates a gallery feel
- Beside mirrors – amplifies light beautifully
- Reading nooks – functional and cozy
- Hallway lighting – makes narrow spaces feel intentional
Pro tip: Look for sconces with remote controls. Trust me, getting up to turn them on defeats the purpose.
Also Read: 10 Stunning and Unique Album Cover Wall Decor Ideas
Woven Basket Wall Display
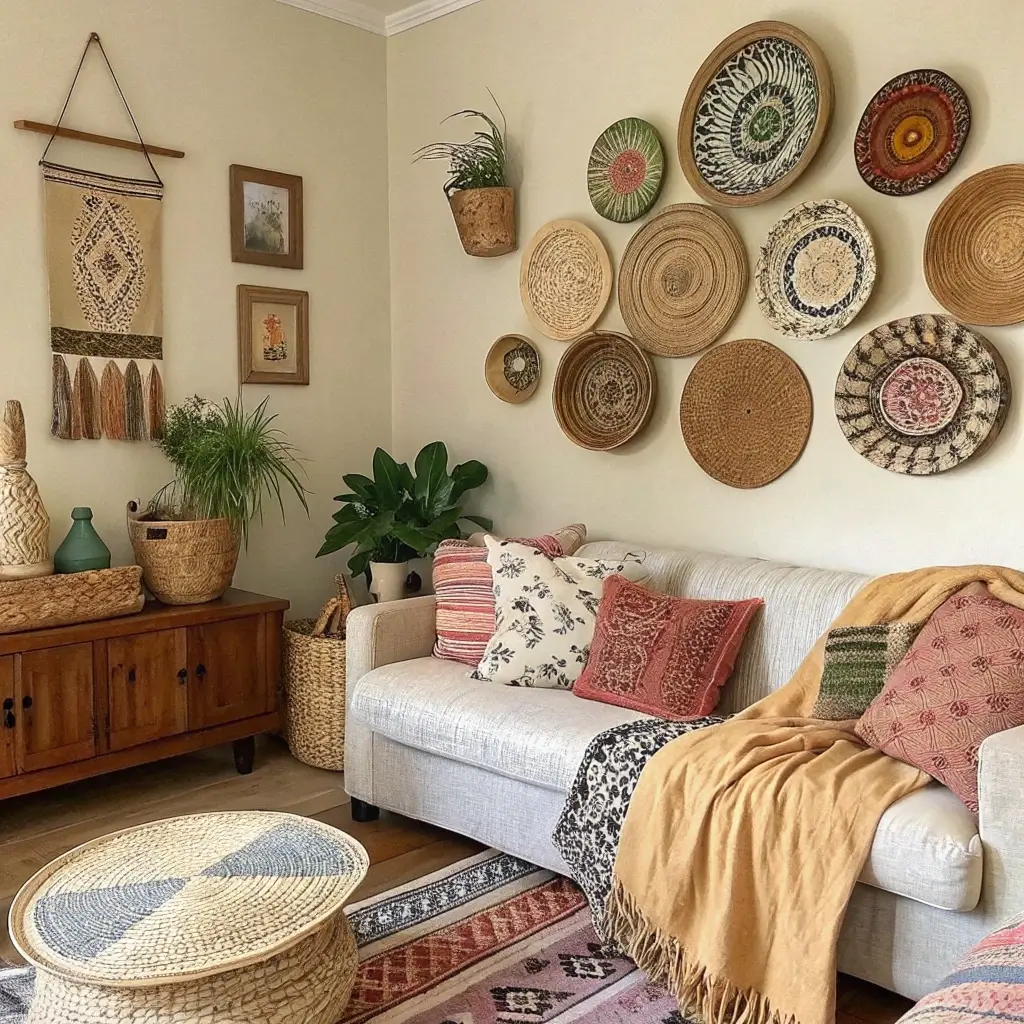
Who decided baskets were just for storage? Woven baskets on walls create texture, warmth, and visual interest that paintings can’t match. Plus, they’re available at every thrift store for practically nothing.
My basket wall cost me less than $30 total. I collected different sizes and textures over a few months, then arranged them salon-style. The organic shapes soften the rigid lines of modern furniture beautifully.
Creating a Basket Gallery
Follow these arrangement principles:
- Vary sizes dramatically – creates visual rhythm
- Mix textures – combine tight weaves with loose ones
- Consider color – natural tones or paint them for cohesion
- Balance the composition – heavy pieces low, lighter ones high
The best part? Baskets are virtually indestructible. No worrying about glass breaking or frames chipping.
Vintage Clock Feature
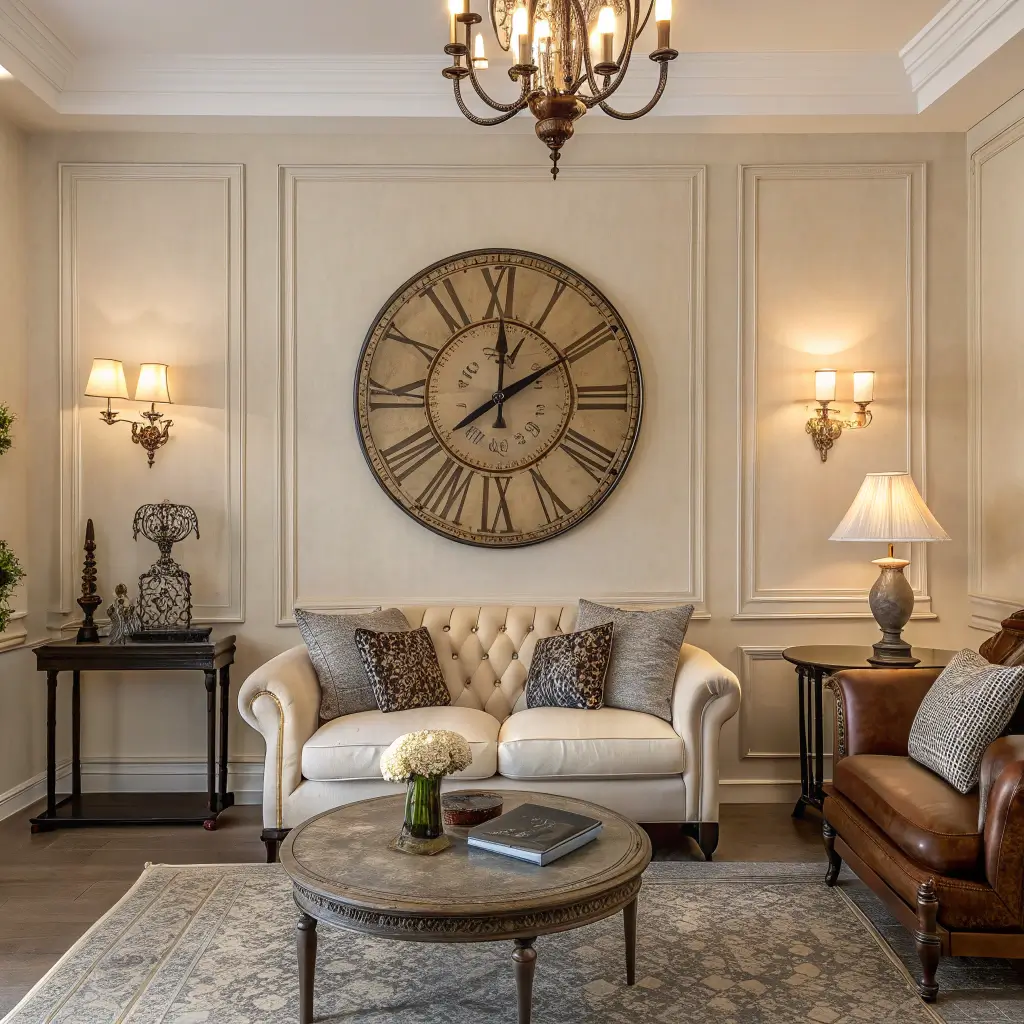
A large vintage clock serves as functional art that never goes out of style. Whether you go authentic vintage or convincing reproduction, clocks add character and create natural focal points.
I found my oversized station clock at an estate sale for $25. It doesn’t even keep time accurately, but who cares? Everyone has phones for that. This baby is pure decoration, and it looks like it cost hundreds.
Styling Around Your Clock
Make your clock the star:
- Give it breathing room – don’t crowd with other decor
- Scale appropriately – bigger is usually better
- Consider the style – industrial, farmhouse, or modern
- Layer with lighting – uplighting creates drama
Remember, the clock doesn’t need to work perfectly. You’re buying ambiance, not accuracy.
Hanging Indoor Plant Wall
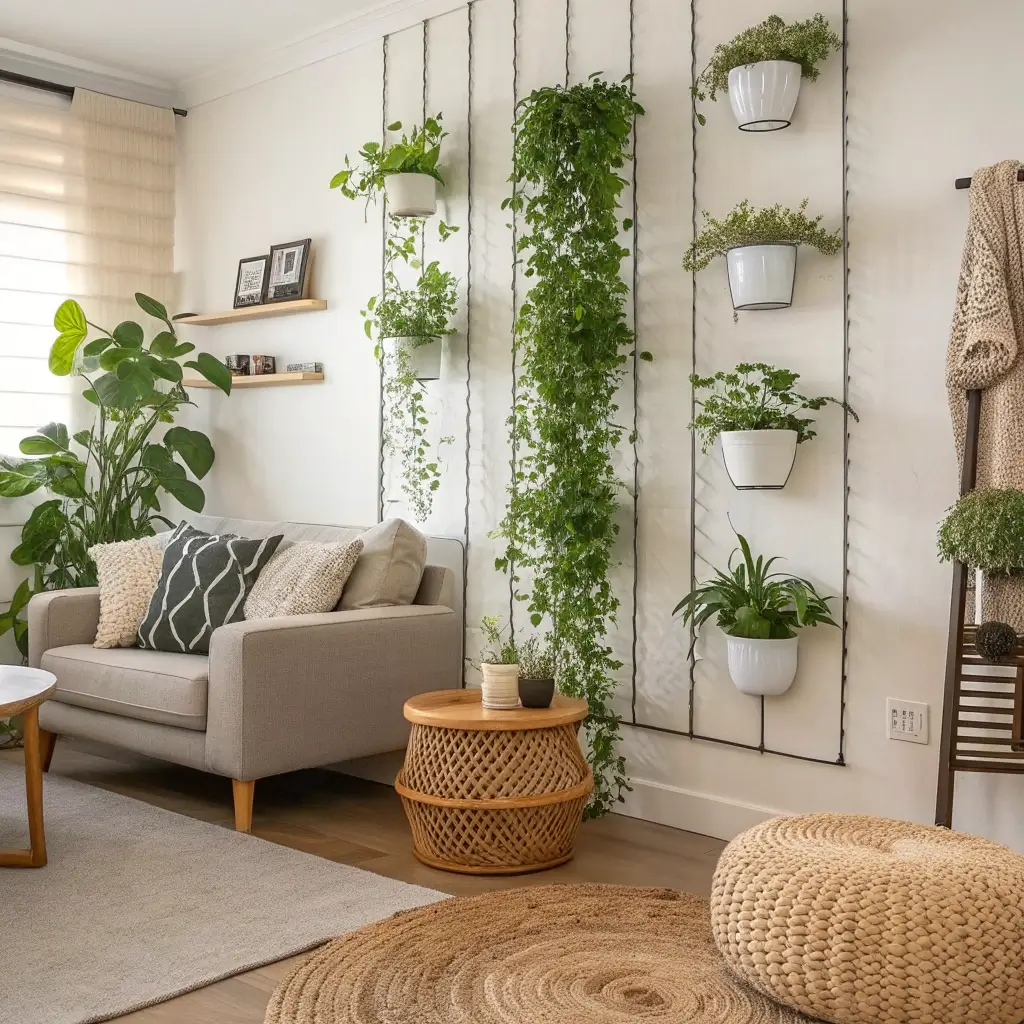
Last but definitely not least, let’s talk about living walls. Creating a plant wall brings life, literally, to your space while purifying your air. And no, you don’t need a green thumb or expensive systems.
I created my plant wall using a combination of macramé hangers, wall-mounted planters, and floating shelves. Total investment: about $60 including the plants. The visual impact rivals those thousand-dollar living wall systems.
Building Your Plant Wall
Start simple with these tips:
- Choose low-maintenance plants – pothos, spider plants, snake plants
- Vary heights – creates visual interest
- Mix planter styles – cohesion through chaos
- Consider light requirements – group plants with similar needs
The secret to keeping plants alive? Water when the soil feels dry, not on a schedule. Most people kill plants with kindness (aka overwatering).
Bringing It All Together
Here’s the thing about decorating on a budget – it’s not about having less, it’s about being more creative. Every single one of these ideas can transform your living room for under $100, most for way less. The trick lies in patience, creativity, and knowing where to look.
Start with one project that speaks to you. Maybe it’s those floating shelves you’ve been eyeing, or perhaps that gallery wall you’ve been planning in your head. Whatever you choose, remember that the best rooms evolve over time. You don’t need to do everything at once.
My living room took two years to reach its current state, and honestly? I’m still tweaking things. That’s the beauty of budget decorating – you can afford to experiment, make mistakes, and change your mind. When you’re not dropping serious cash, you’re free to play.
The walls in your living room are blank canvases waiting for your personality to shine through. Whether you go bold with wallpaper or subtle with botanical prints, whether you choose industrial metal or soft macramé, the important thing is that it feels like you. Because at the end of the day, the best decor budget can’t be bought – it’s the warmth and character that makes a house truly feel like home.
So grab that hammer, hit up some thrift stores, and start transforming those walls. Your living room (and wallet) will thank you. Who knows? You might just discover you’ve got an inner designer waiting to break free. And if not, well, at least you’ll have some great stories about that time you tried to make your own abstract art. Trust me, those disaster stories are worth their weight in gold at dinner parties.
Now stop scrolling through Pinterest and start creating. Those walls aren’t going to decorate themselves!